The enthusiasm shown for the converted keg raffled off at the September club meeting prompted me to offer some tips on building one for yourself. Dammit, Jim, Im a brewer, not a plumber! Relax it's easier than you think. A few tips and points of contact save you some time.
First, a good reference: see Modifying Half-Barrel Kegs for Use as Brewing Vessels, Martin P. Manning, Brewing Techniques, March/April 1994. If you don't have it in hard copy, check out their web site at http://brewingtechniques.com. The actual article can be found at http://brewingtechniques.com/library/backissues/issue2.2/manning.html.
Keg Acquisition. Do this the legal waybuy them from a scrap yard! There are more than a dozen such enterprises listed in the Hampton Roads Yellow Pages under Scrap Metals. Supply is hit or miss, so call before you go. I purchased a half-barrel from Virginia Beach Salvage Exchange, Inc., located off Witchduck Rd between 44 and Va Beach Blvd. At the time they had twenty to choose from; at this writing they were all out. What to look for: pick the straight-sided kegs with the handles on top. They are much more stable on your burner, and are much easier to lift for cleaning and stowage. The straight side also makes it much easier to install a fluid level gauge if you desire at some point. Those not sent back to the brewery are often punctured, so ensure the holes are on the top, which will eventually be cut away.
Cutting out the top. Mannings article covers this nicely. If you go with welding shop to cut out the top, you will probably still need to do some work with a file and some wet-dry sandpaper to get the smooth rim you want. Ive used four different shops in Norfolk, Virginia Beach and Portsmouth, and I am most satisfied with Butler Welding in Portsmouth for most jobs. My thanks for Mike Pensinger for finding Butler, who will cut off the top of the keg and install a valve adapter for $25. Colonial Welding (off Mil Hwy south of I-264) does very fine work, but costs more. I use them for custom fabrication
Stainless Steel hardware. If you use Butler Welding, Mr. Butler will require you to provide the hardware you want installed. Colonial Weldings quote will include hardware, if you desire. F. H. Gaskins on Church Street in Norfolk is the best supplier Ive found for these items. Gaskins can also sell you the ball valve you will need for the drain. Stainless steel is the best for this, but brass-body valves work fine. I have used one for over five years, with no evidence of galvanic corrosion (caused by dissimilar metals in the presence of an electrolyte such as wort). Home Depot also carries brass ball valves, but they are not appreciably cheaper there. Manning recommends 3/8 inch NPT (National Pipe Thread) connections. I use only 1/2 inch. The larger diameter increases flow rates, reduces potential for clogging, and more easily marries up with garden hose fittings. Also, most accessories such as temperature gauges and fluid level sight tubes required a ½ inch female NPT adapter to screw into, so I use ½ inch all around for flexibility of design.
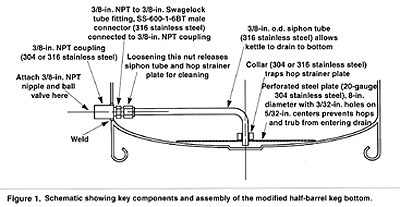
Drain System. Mannings article suggests that the best drain system uses a pickup tube and drains through the side wall of the keg (see diagram with his article). I have one keg configured this way, and another with the drain mounted at the bottom. The bottom mounted design costs a little more, but has some advantages. It is easier to clean and drain than the one with the pickup tube. I have had no problems with scorching or caramelization in the drain pipe. One suggestion: install a ½ inch female NPT adapter through the side wall, ensuring that both openings of the adapter have female threads. Attach the ball valve on the outside with a short (one or two inch) ½ inch NPT pipe nipple. This has male threads on both ends. On the inside, screw in a pickup tube with male threads. Then if at some time you don't like the setup and would like a drain at the bottom, you can use the adapter in the side wall for a temperature gauge.
One last thought. If two brewers each build their own half-barrel and burner system, they can combine their equipment to make a full-grain mashing system. Simply use one kettle for the hot liquor tank, the other for the boil kettle, and throw in a picnic cooler in between for the mash tun. The only thing I like better than brewing is brewing with friends. I hope this gives you a jumping off point for a unique brewing system customized to your brewing style.
Return to the Brewing Techniques index